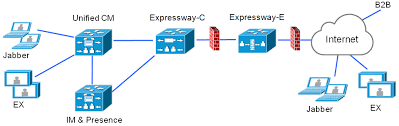
MRA (Mobile and Remote Access) is a technology that allows phone registrations without raw sip signaling sent over the internet. I compare it to RPC over HTTPS proxy, aka “Outlook Anywhere.” Email came first, now I’m not sure if anyone remembers having to VPN in for Outlook to work.

After having several MRA projects back to back, I’ve found that most of the lessons I’ve learned were dealing with project management than the technical pieces. No other piece of hardware or software requires so many different groups of people: the datacenter guy, the firewall guy, the certificate guy, the dns guy, the voice guy. Throw in a business analyst and a project manager and it gets messy. I literally had projects ongoing for months and months when I was able to get MRA working in my lab in just a couple hours. Anytime I finish a project I look at how it could’ve been done better, so here it is:

First: It’s better to think of MRA as 5 separate, independent tasks because almost nothing depends on anything else.

  1. VM Deployment
  2. Networking
  3. Certificates
  4. DNS
  5. Firewall

Second: Clearly define roles and responsibilities per task at the onset of the project. The certificate guy doesn’t care about ip addresses or storage so just gather contact information and give role takers hyper-specific information to keep their attention. Limit emails.

Third: Make the configuration as cookie-cutter as possible. I wouldn’t even mention single NIC with some nat reflexion workaround, you use the advanced networking key with an outside and an inside interface. Public Certs on everything. It’s always a cluster, even if its a cluster of one; you never know when they will scale up. I assume inside out, everything is allowed through the firewall; this is usually the case and customers get confused with the lengthy cisco documentation. I usually give something like below:

Purpose

Protocol

Internet Endpoint (source)

Expressway-E (listening)

XMPP

TCP

>=1024

5222

XMPP federation

TCP

>=1024

5269

HTTP proxy (UDS)

TCP

>=1024

8443

SIP media

UDP

>=1024

36002 to 59999

SIP signaling

TLS

>=1024

5061

HTTPS (Unity)

TCP

>=1024

443

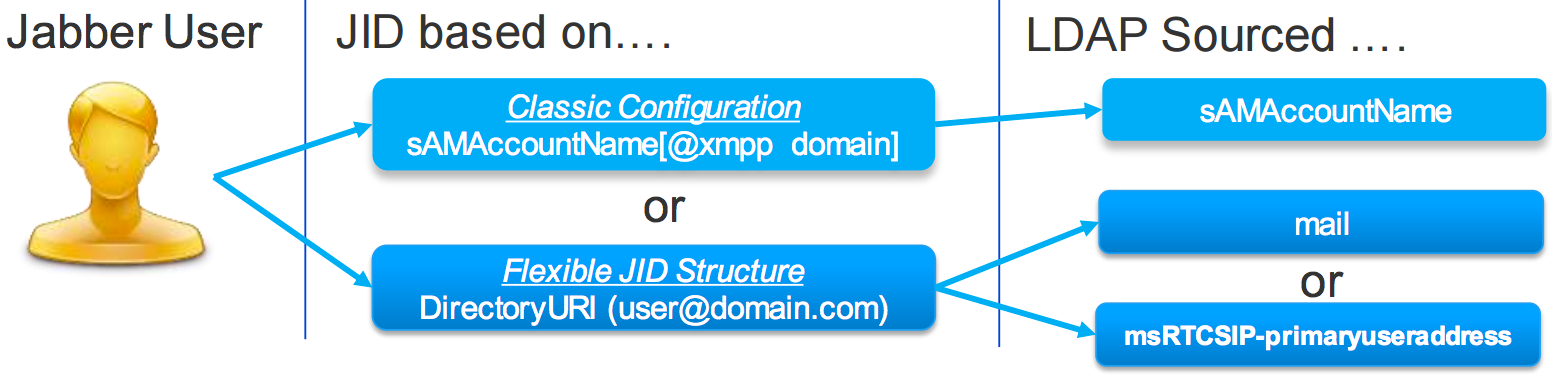
Also, I posted before about Flexible Jabber ID, which allows for multiple presence domains. That can cause holdups if you aren’t allowed to sign for these domains for your cup-xmpp certificate. It becomes an all-or-nothing service model. The best thing to do is get ahead of this and remove services from domains that you cannot sign for! You can run a whois lookup to ensure the technical contact has some relationship with the customer.

For a list of all jabber users and their last login time, you can run the following query:


run sql
select e.userid, cd.timelastaccessed from enduser as e, credentialdynamic as cd, credential as cr where e.pkid=cr.fkenduser and e.tkuserprofile=1 and e.primarynodeid is not null and cr.tkcredential=3 and cr.pkid=cd.fkcredential order by cd.timelastaccessed

This date is in something called “epoch” format. To convert to something that makes sense, you’ll need to use the following formula:

=(((B2/60)/60)/24)+DATE(1970;1;1)+(-5/24)

This is for Eastern Standard Time where -5 = UTC -5, you can change this accordingly.

expresswayc-e

There are a number of deployment options for Expressway depending on your customers environment, which could lead you to having to come up with creative solutions. This is called engineering.

We know external services need to be discovered using “outside” dns, however what happens when a customer uses a single dns server for outside and inside networks? Well, The traversal zone will need to be a FQDN for TLS validation, so it needs to use dns to resolve the inside addresses, but clients on the public internet need to use dns to resolve the outside address of the Expressway E.

expc-mra_-_Edit_zone

Tandberg VCS aka Cisco Expressway runs on linux and uses a lightweight network services package called dnsmasq

Being a linux guy, the first thing I tried was editing the /etc/hosts file, but to prevent hacking, everything is on a read-only filesystem except for the /tandberg mount, which also had an etc but changes were not persistent. After poking around I found the dnsmasq.conf man pages here and an option to specify a “conf-dir” to include configuration files that are loaded on start.

For static A records, create a file called hosts.conf

/tandberg/etc/dnsmasq.conf.d/hosts.conf

address=/expe-mra.car.pnslabs.com/10.20.30.40

For static SRV records, create a file called srv.conf

/tandberg/etc/dnsmasq.conf.d/srv.conf

srv-host=_cisco-uds._tcp.car.pnslabs.com.,cucm.car.pnslabs.com.,8443,100,0

After adding the file, you’ll need to restart dnsmasq:

/etc/init.d/dnsmasq restart


Unlike other “report this problem” buttons, Jabber’s problem report doesn’t just fly into the cloud somewhere never to be seen again.

It actually contains a lot of useful information about things like: how services are discovered and assigned, what policies are defined, what devices are configured, etc. The problem report can be generated, but is located below:

\Users\AppData\Local\Cisco\Unified Communications\Jabber\CSF\Logs\csf-unified.log

One of the biggest questions I get is where configurations exist, and what takes priority ? Before looking at the file, I would have guessed 3 places, but as you can see below its actually 12!

1: TftpOverrideConfigStore [10] jabber-config.xml
2: LocalFileConfigStore [20] AppData\Roaming\Cisco\Unified Communications\Jabber\CSF\Config\jabberLocalConfig.xml
3: Ucm90ConfigStore [25] http://cucm.fqdn.com:6970/SPDefault.cnf.xml
4: PresenceAuthenticatorStore [28]
5: ServiceDiscoveryConfigStore [29]
6: PresenceConfigStore [30] Presence Server TFTP+CCMCIP Settings
7: RegistryConfigStore [31] HKCU\Software\Cisco Systems, Inc.\JabberWerxCpp
8: PresenceProductModeStore [35]
9: UrlProvisioningConfigStore [499]
10: BootstrapConfigStore [500] ProgramData\Cisco Systems\Cisco Jabber\jabber-bootstrap.properties
11: InMemoryConfigStore [600]
12: jabber-config-defaults.xml [2147483647] Program Files (x86)\Cisco Systems\Cisco Jabber\jabber-config-defaults.xml

Each of these stores contain configuration elements in the form of <tags>, retrieved from either the local machine, or through HTTP GET requests

When Jabber is launched, Jabber first tries to read jabberLocalConfig.xml for cached settings, if any exists. It then attempts to reach the domain controller of the machine you are running on for SSO. If both of those fail, only then will it give you a login prompt. If no cached username is found, email is prompted for and DISCOVERY begins.

retrieve email address and parse domain:

Getting LastLoggedInUserName from ConfigFeatureSet
Getting servicesDomain from ConfigFeatureSet
Getting PresenceDomain from ConfigFeatureSet
ServicesDomain key not found, parsing email address.
Retrieved Email Address jhalpert@car.pnslabs.com
Retrieved DNS Domain ‘car.pnslabs.com’ from ‘Email Address from UserInput’
Domain is set to: car.pnslabs.com

check for webex im:

makeCasLookupForDomain result is ‘Code: NOT_WEBEX_CUSTOMER; CasUrl: http://loginp.webexconnect.com/cas/FederatedSSO?org=car.pnslabs.com;

check SRV records for on-prem and mra:

*—–* DNS query _cisco-uds._tcp.car.pnslabs.com. has succeeded.
*—–* DNS query _collab-edge._tls.car.pnslabs.com. has failed: DNS name does not exist.

determine home cluster:

*—–* Making HTTP request to: https://cucm.car.pnslabs.com:8443/cucm-uds/clusterUser?email=jhalpert@car.pnslabs.com

fetch user data:

https://cucm.car.pnslabs.com:8443/cucm-uds/user/jhalpert
https://cucm.car.pnslabs.com:8443/cucm-uds/user/jhalpert/devices
https://cucm.car.pnslabs.com:8443/cucm-uds/user/jhalpert/credentials
https://cucm.car.pnslabs.com:8443/cucm-uds/user/jhalpert/extensions/
https://cucm.car.pnslabs.com:8443/cucm-uds/user/jhalpert/subscribedServices
https://cucm.car.pnslabs.com:8443/cucm-uds/user/jhalpert/speedDials
https://cucm.car.pnslabs.com:6970/SPDefault.cnf.xml
https://cucm.car.pnslabs.com:6970/global-settings.xml

set location:

setCurrentLocationOption start: description: Jeffs House ,id: fff8ffb0-1332-4da7-ba78-647b35aa25b2
IsGatewayAddressSubnetExists: gateway address: 00::50::56::E3::E5::50, subnet: 172.16.13.0, locations: 1

The need to share dial plan information between multiple call control nodes has been around since gatekeeper, but I find the latest iteration, GDPR, particularly smooth.

Gatekeeper had its downsides: additional hardware costs, lack of URI or +E164 support, and reliance on H323 protocol. CUCM 8 introduced CCD (Call Control Discovery) using SAF (Service Advertisement Framework), but since it required end-to-end EIGRP and a complex configuration, I’ve never known anyone to actually use it. With CUCM 9 came Intercluster Lookup Service (ILS) I did a write up on a year or so ago. The first iteration only supported URIs but was onto something. ILS adds a route string to the database, which tags Directory URIs on each node. Route strings use sip route patterns as opposed to traditional route patterns to dynamically route.

GDPR is simply the addition of numbers and patterns tagged with a route string in ILS. GDPR is supported in CUCM 10+ and uses the following new system partitions:

Directory URI: As soon as the directory number is associated to the end user, this becomes the primary URI on the directory number page.

dna
directoryuri
Global Learned E164 Numbers / Global Learned Enterprise Numbers:

On the directory number page, two new fields “add enterprise alternate number” and “add +E164 alternate number” have been added. Simply check “Advertise Globally via ILS” and these numbers will show up on ILS neighbor clusters as “Global Learned Enterprise Numbers” or “Global Learned E164 Numbers”

numbers

Global Learned E164 Patterns / Global Learned Enterprise Patterns:

Under Call Routing, a new option “Global Dial Plan Replication” has been added. Advertised Patterns is where you can add entire patterns you want to advertise. I find this is easier to manage rather than advertising each number individually; although its nice to have that granularity, it’s usually not necessary.

advertised

To view learned Numbers, Patterns, and Directory URIs, you can find these under “Global Dial Plan Replication” and “View…“, or you can run a traditional route plan report. This is much improved to the “utils ils lookup” needed with CUCM 9.

The default IM address scheme is to take the userid and append @defaultdomain to the end. This may work for smaller deployments, but caused a lot of confusion when multiple domains or subdomains were used. Flexible Jabber ID allows the IM address scheme to be mapped to Directory URI which is then mapped to either mail or msRTCSIP in LDAP.

jid

Changing the IM address scheme to Flexible JID is simple:

    • Stop the following services:
      Cisco Presence Engine
      Cisco SIP Proxy
      Cisco XCP Router
      Cisco Sync Agent
      Cisco Client Profile Agent
    • Presence > Settings > Advanced Configuration:
      Change IM Address Scheme to Directory URI and save.

imaddress

You can now browse to Presence > Domains to see a list of all domains in your presence environment.

You may find that some should not be there, as a lot of people like to add external contacts in their active directory with an ipPhone field populated. This will cause issues down the road if you deploy Mobile and Remote Access and want to do XMPP Federation. You’ll need to be able to sign for each domain. You’ll want to filter these out either by ldap filter into CUCM, or UC Service Profile. The Default Domain above also gets put into the CSR, so make sure to change that as well.

You can run the sql query below to clear the domains from the CSR once they are removed from the system:

run sql select * from impresencedomains

run sql delete from impresencedomains where pkid=’pkid_from_step_1′

To take advantage of Flexible Jabber ID, you must be running Jabber 10.6.6 or higher !

I’m not sure why Cisco didn’t include “custom file” option to update lines like you can phones, but if you have the list of numbers to change call forwarding rules, you can use the following queries which are a part of the numplan table. Call Forward All rules are in another table callforwarddynamic which i’ll cover later:

cfbvoicemailenabled = call forward busy external set to voicemail (boolean)
cfbdestination = call forward busy external destination
cfbintvoicemailenabled = call forward busy internal set to voicemail (boolean)
cfbintdestination = call forward busy internal destination
cfnavoicemailenabled = call forward no answer external set to voicemail (boolean)
cfnadestination = call forward no answer external destination
cfnaintvoicemailenabled = call forward no answer internal set to voicemail (boolean)
cfnaintdestination = call forward no answer internal destination

An example query below:

run sql update numplan set cfbvoicemailenabled = (‘f’), cfbintvoicemailenabled = (‘f’), cfnavoicemailenabled = (‘f’), cfnaintvoicemailenabled = (‘f’) where dnorpattern = “1111111”

Making bulk changes in CUCM can be done in 3 ways:

  1. bulk operations built into cucm – great but very limited
  2. import/export of tar file – all details – concise but requires change freeze
  3. sql operations – sometimes the best option

The following example I needed to update each line text label to add “Agent” to the beginning. Built in operations would only allow me to change the label all together, not append text. Import / Export would work fine, but for 10,000 phones this would take a full day to process. In this case SQL was my best option. The query below matches the line and updates the label. I used excel and the concatenate function to pump out all of the required operations.

run sql update devicenumplanmap set (label) = (‘Agent – 1112001’) where fknumplan = (select pkid from numplan where dnorpattern = “1112001”)

The vlookup function in excel is one of the most powerful tools to a voice engineer, which at times can seem more like being a database administrator. The logic here is simple: find the user id from the table on the left in the user id column on the table in the right. When you find it, return the value in the row x number of rows away.

=VLOOKUP(lookup_value, table_array, col_index_num, [range_lookup])

lookup_value = userid

table_array = the entire table on the right. the leftmost column must contain the lookup value

col_index_num = how many rows to the right to grab the value to return

range_lookup = false always!

vlookup

So I took the CCIE lab and failed my first attempt. I realize now it’s more about efficiency and speed than skill. 8 hours goes by in what seems like an hour. So I decided what I needed to do was practice the lab by repetition. After creating a mock lab, I made snapshots in vmware, then created a Power CLI script and bat file to revert to the snapshot and power back on. In one click I can just start all over and do it again!

revert.ps1:

Connect-VIServer -Server vcenter -User root -Password blahblah

$VMs = Get-Content ‘C:\vmlist.txt’
Get-Snapshot -VM $VMs -Name ccie | Foreach-Object { Set-VM -VM $_.VM -Snapshot $_ -Confirm: $false }
Start-VM -VM $VMs

vmlist.txt:

HQ-PUB
HQ-SUB
SB-PUB
HQ-CUC
HQ-CCX
HQ-IMP

startover.bat:

C:\Windows\System32\WindowsPowerShell\v1.0\powershell.exe -PSConsoleFile “C:\Program Files (x86)\VMware\Infrastructure\vSphere PowerCLI\vim.psc1” -NoExit -Command “& ‘C:\revert.ps1′”