Webex Teams recently released support for Adaptive Cards, which allow the user to interact with a teams user (typically a bot) without leaving the page. This is great for taking quick polls, and also piping data from other applications like help desk, travel and expenses, crm, etc.

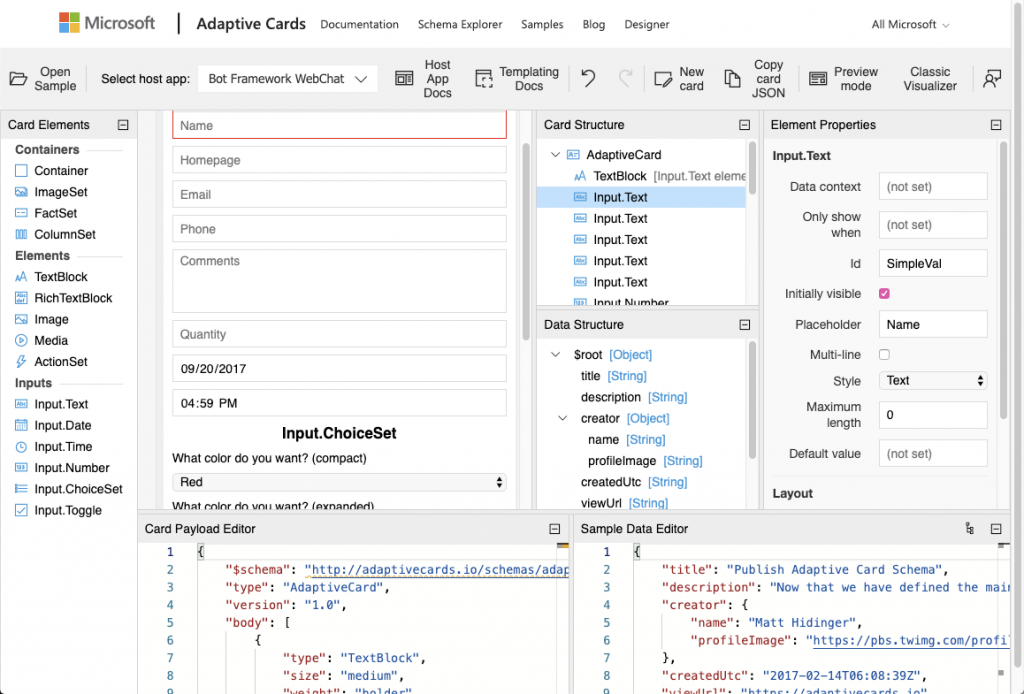
I love that Cisco adopted the Microsoft standard for Adaptive Cards instead of trying to create their own unnecessarily. The website, adaptivecards.io has great documentation, and a designer to help get started. There is an author sdk as well, but I find that using a templating system such as Jinja2 does the job without learning anything new.

adaptivecards.io/designer

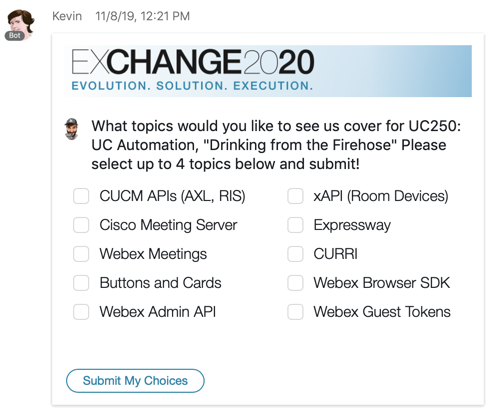
I teach a class at our companywide conference every year called UC Automation, and I thought what a better way to teach about Buttons and Cards (aka Adaptive Cards) than by using it in the class itself. A month prior to the conference, I sent a poll to everyone that registered so they could pick the topics they want to hear about most.

UC Automation: Drinking From the Firehose

To use Adaptive Cards in Webex Teams, I created an example in 🐍Python

First install prerequisites:

pip install requests
pip install webexteamssdk
pip install flask

brew install ngrok
ngrok http 3000

Next

import json
import os
import requests
from webexteamssdk import WebexTeamAPI, ApiError
from flask import Flask, request
app = Flask(__name__)

'''
For prototyping, we use ngrok.
We'll request the tunnel and parse the url to use for a webhook
'''
tunnel = json.loads(
  requests.request('GET', url = 'http://localhost:4040/api/tunnels'
  ).text
)
public_url = tunnel['tunnels'][0]['public_url']

'''
Specify the webex token and roomId to use
'''
token = os.environ['token']
roomId = os.environ['roomId']

'''
Using webexteamssdk but also need requests
for attachment action endpoint which is not in sdk yet!
'''
wbx = WebexTeamsAPI(access_token = token)
headers = {
  'Authorization': 'Bearer ' + token
}

'''
Register webhook to ngrok for attachmentActions
'''
for webhook in wbx.webhooks.list():
  wbx.webhooks.delete(webhook.id)

wbx.webhooks.create(
  name = 'Development - ngrok',
  targetUrl = public_url,
  resource = 'attachmentActions',
  event = 'created'
)

'''
Paste Card from adaptivecards.io/designer to a file named card.json 
'''
attachments = []
attachment = {}
attachment['contentType'] = "application/vnd.microsoft.card.adaptive"
attachment['content'] = json.loads(open('card.json').read())
attachments.append(attachment)

'''
Send Message
'''
wbx.messages.create(
  roomId = roomId, 
  markdown = '.', 
  attachments = attachments
)

'''
Receive Data in Webhook and Request Action Payload
'''
@app.route('/', methods = ['POST'])
def index():
  action = request.json['data']['id']
  results = requests.request('GET',
  headers = headers,
  url = f '{wbx.base_url}attachment/actions/{action}'
)
  print(json.loads(results.text))
  return ('', 200, None)

if __name__ == '__main__':
  app.run(port = 3000, use_reloader = True)

Just like with the messages webhook resource, the payload does not include the data, but rather an action id that is used along with the token to retrieve the data, shown below:

{'created': '2019-11-08T21:47:14.436Z',
 'id': 'asdfasdfasdfasdf',
 'inputs': {
  'comments': 'Here’s a great idea.  Get a real job!'
 },
 'messageId': 'qwerqwerqwerqwerqwerqwer',
 'personId': 'fghjfghjfghjfghjfghjfghj',
 'roomId': 'vbnmbnmvbnmvbnmvbnmvbnm',
 'type': 'submit'}

For my UC Automation class, I stored the results in AWS. Below is a fun script to gather the results and display them with emojis.

from boto3 import *
table = resource('dynamodb').Table('count')

results = table.get_item(Key={'use': 'uc250'})
results = rd.replace_decimals(results['Item'])
del results['use']
results = list(results.items())

for topic in results:
    chart = 😎
    for i in range(0, int(topic[1])):
        chart = chart+'😎 '
    print(topic[0]+': '+chart)

$ python collect.py

expressway: 😎 😎 😎 😎 
guest: 😎 😎 😎 😎 😎 😎 😎 😎 😎 😎 😎 😎 😎 😎 
cucm: 😎 😎 😎 😎 😎 😎 😎 
buttons: 😎 😎 😎 😎 😎 
admin: 😎 😎 😎 😎 😎 😎 😎 😎 😎 😎 😎 😎 😎 😎 😎 😎 
xapi: 😎 😎 😎 
browser: 😎 😎 
curri: 😎 😎  
cms: 😎 
meetings: 😎 😎 😎 

expresswayc-e

There are a number of deployment options for Expressway depending on your customers environment, which could lead you to having to come up with creative solutions. This is called engineering.

We know external services need to be discovered using “outside”Β dns, however what happens when a customer uses a single dns server for outsideΒ and insideΒ networks? Well, The traversal zone will need to be a FQDN for TLS validation, so it needs to use dns to resolve the inside addresses, butΒ clients on the public internet need to use dns to resolve the outside address of the Expressway E.

expc-mra_-_Edit_zone

Tandberg VCS aka Cisco Expressway runs on linuxΒ and uses a lightweight network services package called dnsmasq

Being a linux guy, the first thing I tried was editing the /etc/hosts file, but to prevent hacking, everything is on a read-only filesystem except for the /tandberg mount, which also had an etc but changes were not persistent. After poking around I found the dnsmasq.conf man pages hereΒ and an option to specify a “conf-dir” to include configuration files that are loaded on start.

For static A records, create a file called hosts.conf

/tandberg/etc/dnsmasq.conf.d/hosts.conf

address=/expe-mra.car.pnslabs.com/10.20.30.40

For static SRV records, create a file called srv.conf

/tandberg/etc/dnsmasq.conf.d/srv.conf

srv-host=_cisco-uds._tcp.car.pnslabs.com.,cucm.car.pnslabs.com.,8443,100,0

After adding the file, you’ll need to restart dnsmasq:

/etc/init.d/dnsmasq restart


As a person who enjoys weekends and sleep, my favorite friday night cutover is one that lasts approximately 30 seconds. To do this, you need three things:

-Enough resources to temporarily have two of everything
-A portgroup configured with an isolated VLAN
-A staging PC for use as an NTP server (I recommend Meinberg NTP for that)

After building and testing your new environment, you’ll want to “flip the nics” to make the new system live:

Connect-viserver vcenter01.dom.com -User admin -Password pass

Get-Cluster “Old-UC-Cluster” | Get-VM | Get-NetworkAdapter | set-networkadapter -Connected:$false -Confirm:$false

Get-Cluster “New-UC-Cluster” | Get-VM | Get-NetworkAdapter | Set-NetworkAdapter -Portgroup “VLAN 9” -Confirm:$false

This is in a sunny day scenario where everything in the whole cluster is disconnected while everything in another is connected. Sometimes you need to apply some logic to exclude some vms that happen to coexist within the same cluster:

Get-Cluster “New-UC-Cluster” | Get-VM | Get-NetworkAdapter | Where {$_.NetworkName -eq “VLAN 3” -and $_.Name -notlike “CUCMSUB2”} | Set-NetworkAdapter -Portgroup “VLAN 9” -Confirm:$false

UC applications aren’t only supported by Cisco on a virtual platform now, it’s the ONLY supported platform. As a “Collaboration Engineer” by title, I am usually focused on only a handful of applications, traditionally relying on the “Datacenter Guy” to provide the infrastructure and hope it works. But, it’s always good to see the whole picture.

In my opinion, virtualization is something everyone needs to know at least the basics of. You might not be the one adding a vlan to a switch anymore, but you still need to know networking.

Each VM contains two basic files: one .vmx (configuration) and one .vmdk (disc)
The .vmdk (disc) is considerably larger and contains all the bits a physical hard drive would. The .vmx (configuration) is a small, editable file containing all of the settings a physical bios chip would.

A few items you’ll find in a .vmx file:
numvcpus = “2”
memsize = “6144”
scsi0:0.fileName = “UCCX1.vmdk”
ethernet0.networkName = “Voice_VLAN”
guestOS = “rhel4”
sched.cpu.min = “1300”
sched.cpu.units = “mhz”
sched.cpu.shares = “normal”
sched.mem.minsize = “6144”
sched.mem.shares = “normal”
One task any Cisco UC Engineer will go through at least once is an upgrade from pre 8.6 to post 8.6 version. Two changes come about: an OS change from Redhat 4/5 to 6, and adapter change from flexible to vmxnet3.

One method is to edit the .vmx by finding it on the datastore, downloading the file, making the edits below, and import it back:
guestOS = “rhel6_64guest”
ethernet0.virtualDev = “vmxnet3”
An easier method if you are doing multiple servers/clusters at once is to use PowerCLI
Connect-VIServer -Server vcenter01 -User admin -Password pass
Set-ExecutionPolicy RemoteSigned
Set-VM -VM ‘UCCX Pub’ -GuestId “rhel6_64guest” -Confirm:$false
Get-VM ‘UCCX Pub’ | get-networkadapter | set-networkadapter -type vmxnet3